Creating simple maps of
familiar places, and then asking kids to use these maps to find
hidden objects is a fun way to teach kids basic map skills and hone
their spatial skills. This activity will also help kids develop an
understanding of direction (which way?), location (where?), and
representation (what a drawing stands for). As you do the activity
with your child, use words that describe an object’s location
and position relative to other objects, such as
above,
next to, below, behind, and between.
Encourage your child to use these words, too.
Skills: geometry and spatial sense
Age Range: 3-6 year olds
Map It!
What’s That Shape?
Take it Further
Choose a familiar place
to map. If it’s your child’s room, spend some time with
your child discussing the shape of the room and the location of
different pieces of furniture in the room. Use position vocabulary
such as
next to, on top of, under, between,
over, behind, etc. Ask your child, “Is
your room shaped more like a square or a rectangle?” Ask her to
describe where her bed is relative to other furniture or room
features (e.g., is it next to a window, between two windows, or next
to the door?). Do this with other furniture, too. Once you’ve
spent some time talking about your child’s room and what’s
in her room, you are ready to map it! If it’s a nice day you
might want to create a map of your backyard or a nearby park.
What You Need:
How to use the mapping tool:
-
To create a new map, choose: “Start a New Map.”
-
What
is the shape of the room or outdoor space? Choose a layout and then
click “Next.”
-
What
is the floor of the room or outdoor surface made of (e.g., wood,
tile, carpet, grass, and stone)? Choose a floor or outdoor surface.
Pick a color for the floor or outdoor surface. Then click “Next.”
-
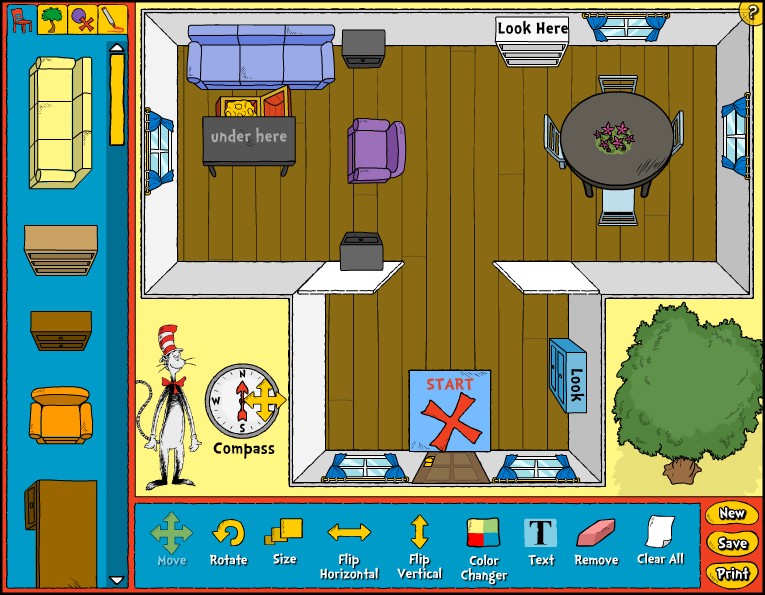
Now
you are ready to add furniture or other items to your room or
outdoor space. For furniture, click on the red chair at the top
left of the map tool. For outdoor items, click on the green tree.
For other things such as shapes, a treasure chest, a window, or a
door, click on the button with the red “X” and purple
circle. If you want to add an item that is not shown, you can use
the drawing tool (button with marker on it) to draw a picture of it.
TIP: To move the items into the map, click on the item to pick it
up, move it where you want it in the map, and then click on it again
to drop it.
-
Position
the items exactly where you want them in the map by using the tools
along the bottom. You can “Move,” “Rotate,”
“Flip Horizontal,” “Flip Vertical,” and
“Resize” any item. You can also change the color of any
item with the “Color Changer.” If you want to remove
an item from your map, click on the “Remove” tool and
then click on the item. If you want to remove all the items from
you map and start over again, click on “Clear All.”
-
You
can add text to your map by clicking on the “Text” tool
and then clicking on the place in the map where you want to add the
text. A line of text will appear. Click on the line of text and
then type over it to change it to whatever you want it to say.
-
Once
you finish your map, you can use the buttons in the bottom right to
either “Save” it or “Print” it. If you want
to start all over again and create a new map, then click on “New.”
-
When
you save a map, you will be asked to give it a name. Be sure you
give it a distinctive name, so you won’t have any trouble
remembering it if you want to reload it in the future.
Once
you’ve mapped your child’s room, invite your child to
play a hide-and-seek game with a “treasure” such as one
of your child’s favorite stuffed animals.
-
Hide
the “treasure” somewhere in the room. Mark its location
on the map with an “X.” You will find an “X”
in the mapping tool by clicking on the button with the “X”
and the purple circle. Now ask your child to use the map to find the
treasure. As she looks for it, give her clues by using position
words. For example: “It’s between
two pillows,” or “under a table,” or “ next
to a chair.” Once your child finds
the treasure, as her to hide it for you to find. Show her how to
mark its location on the map.
-
Understanding
even simple maps can be challenging for a young child. You may
first want to try this activity by hiding the treasure and then
giving hints with only your words. For example, “It is under
something big and blue that we sit on to read books together;”
or, “It’s under the bed;” or, “It’s
behind the door.” Once your child is familiar with the game
and the position words you are using, you can introduce her to the
map.
Challenge
your child to a shape guessing game by using the shapes that are
available in the mapping tool. Choose a layout, and then click on the
button with the “X” and purple circle. You’ll find
six shapes—square, rectangle, pentagon, triangle, circle, and
oval. Click and drag a shape into the layout. Ask your child to name
the shape and count the sides. Or if your child does not know the
name of the shape, just ask her to count the sides and then say,
“That’s right, the shape has 3 sides. A shape with 3
sides is a triangle.” Now ask your child to use the drawing
tool to draw a matching shape. Continue this activity with other
shapes.
Create
a treasure map that your child can use to find “buried
treasure” in your backyard or in a nearby park or playground.
Put small toys or candies into a box and hide it somewhere outside.
Mark its location on the map by using the “X” or the
treasure chest icon found by clicking on the button with the red “X’
and purple circle. As your child is searching for the “treasure,”
use position vocabulary to help guide her. For example, “What’s
that
next to the big
tree?”; “Is the treasure
under
the bush or
between
the bush and the tree?” When your child finds the treasure ask
her to describe where she found it using position vocabulary.
Use the
“Text” tool to label items in your map. For example,
“Bed,” “Table,” and “Door.” Ask
your child to tell you what letter each word begins with, and what
sound each letter makes. For older kids, ask them to name items in
the map and spell them for you. Introduce kids to new vocabulary by
typing labels for items in your map that might be unfamiliar to your
child. For example, “dresser,” “wardrobe,”
“fountain,” or “birdbath.”
Map: a visual representation, usually on a flat surface, of an area or a space.
Position Vocabulary:
up, down, above, over, under, on, beside, inside, outside, in front, under, around, through, behind, next to, on top, near, far
There’s a Map on My Lap!
By Tish Rabe, illustrated by Aristides Ruiz. Random House, 2002.
As the Crow Flies: A First Book of Maps
By Gail Hartman, illustrated by Harvey Stevenson. Aladdin, 1993